

A Proper Guide On How To Sit Properly In A Chair At Work
Contents
The office workstation permits to carry and sit comfortably as giving for voluntary change for the working position.
There are three contact areas for workspace which after the posture of the workers: the work surface, the floor, and the seat.
To get more comfortable posture, you must have any two of them amongst the three options.
If you fail to do anything, there is no alternative than a fully adjustable chair. The other may be a preferable option, maybe a fully adjustable desk.
The value of this type of desk would not make it option practical. The other good way is to use an adjustable chair along with footrest to ensure postural comfort.
We have many workplace injuries that we can avoid. Prevention is better than cure the proverb goes.
How To Sit Properly In A Chair At Work
Here is a list of for step checklist to show you how to sit properly in a chair at work. Make sure that it is safe and comfortable and productive for the office.
STEP 1: Your Chair
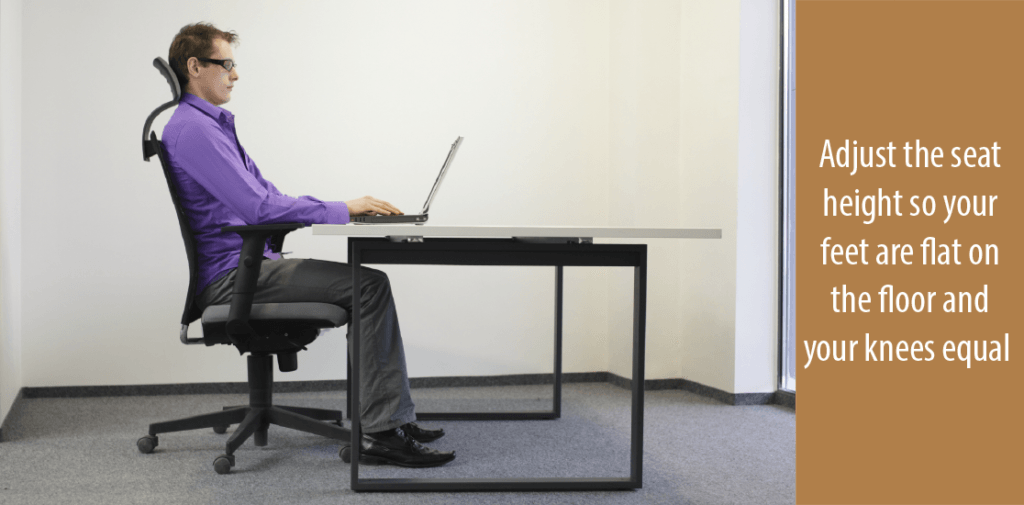
- Push your back as much as you can to the back of the chair.
- By keeping feet flat on the floor, adjust the height of the chair and keep knees equal or little lower than your hips.
- Place the back of your chair from 100 to 110-degree recline angle. Be sure the lower and upper back are much supported. Use small pillows and inflatable cushions if need. If you possess an active back mechanism for your chair, apply it for changing position frequently.
- Confirm the armrest so that the shoulder is more relaxed. As the armrests are in this way, take away or remove it.
STEP 2: Your Keyboard
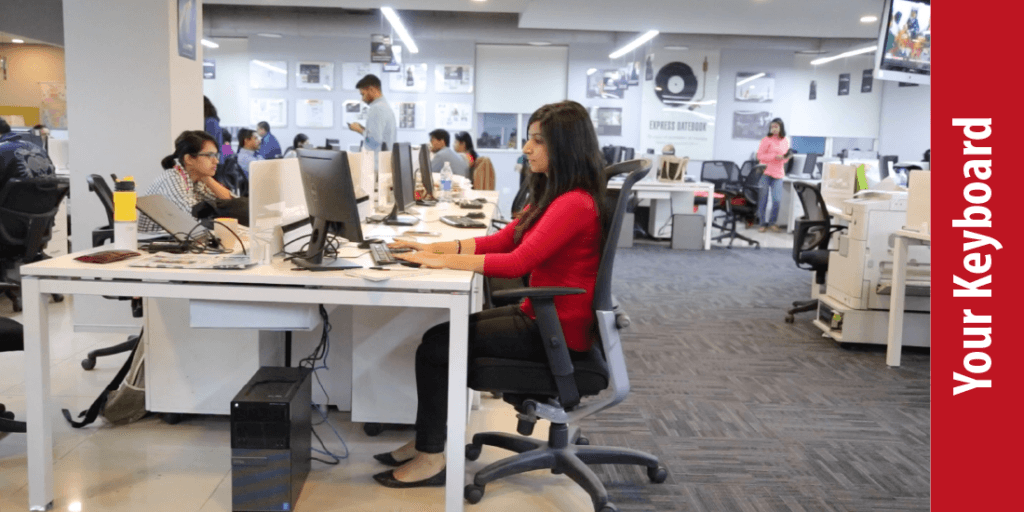
A keyboard tray or a computer keyboard which ensures comfortable keying or typing.
- The keyboard should be kept to a height that permits your elbow to bend well about ninety degrees and near to your sides.
- Many keyboards, as well as keyboard trays, hold wrist supports to aid keeping your wrists in a straight or neutral position. Wrist pads are there for brief rests.
They are not meant to be utilized at the time of typing. Some people find pads are very useful though they use mouse or keyboard.
If you use mouse or type, tray raises your forearms a little to keep your wrist in the neutral position, and your hands and arms can move freely.
You possess arm rests for on your chair; you can adjust them as the forearm is parallel to the wrists and floor are neutral.
Your wrist is in a neutral position if the thumb is in line with the wrist or the forearm is lightly back, as your arm is hanged at your side.
You can alternate between keeping your wrist on the pad and raising them up. As you use a wrist pad, it is better to keep the heel and palm on the support, instead of the wrist.
The tilt of your keyboard may be adjusted. When the keyboard is flat, some people get more comfort or relax or little stilted down to the top. Attempt from various angles and find the most comfortable one.
STEP 3: Screen, Document, And Telephone
Incorrect positioning of source documents or screen may result to awkward posture. Adjust them well so that your neck remains in a neutral or relaxed position.
- Keep the screen in the center directly of you over the keyboard.
- Keep the screen two to three inches above from the eye level. If you are a user of bifocals, lower the screen according to your comfortable reading level.
- Keep yourself away from at least an arm’s length from the screen and after that adjust your vision.
- Lessen glare by the wonderful positioning of the screen. Keep source documents before you, between the keyboard and the screen, by using an inline copy stand. If it has more space keep source documents with a document holder keeping adjacent to the screen.
- Keep screen to the right angles beside windows
- Adjust blinds or curtains as required
- Keep screen control and the vertical screen angle to less glare from overhead light
- The other way to reduce glare is the use of light filters, optical glass glare filters, and secondary task lights.
Keep telephone within your reach. Arms may help or telephone stands. - Use speaker or headsets to remove cradling the handset.
STEP 4: Pauses And Breaks
If you correctly adjust your computer workstation, apply good work habits. How perfect static posture, prolonged and the environment does not matter.
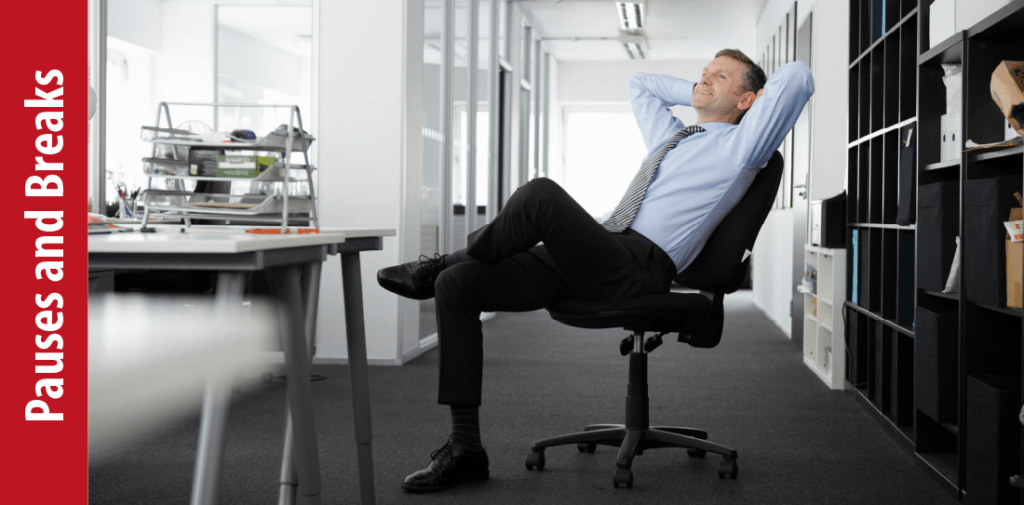
They would aid to help good blood circulation and may take a toll on your body. Below pause and break tips can show you how to sit properly in a chair at work:
- After twenty or thirty minutes take a short break from one to two minutes. After one hour take a break for five to ten minutes or change the task. At the time of lunch break, try to keep yourself away from your computer.
- Escape eye fatigue by refocusing or resting your eyes regularly. Watch monitor from a long distance and focus on to something from a distance.
- Rest the eyes by keeping your hand with palms for ten to fifteen seconds.
- At the time of working use accurate pressure. Keep it moving as much as you can. Information serves by UCLA Ergonomics.
Proper Sitting Posture While Studying
1. Break Up
You may break up the sitting position at the time of walking or standing. Move the body and keep the circulation flowing instead of being stagnant. You mustn’t be stationary for a long time as it can create postal problems.
2. Get Moving
Exercise and the flow of blood with help you to maintain a well posture for a long time. Moreover, it enhances your concentration. At the time of doing your study, you must do some squats, step it up and combine the study along with exercise.
Oxygenation. Oxygen helps more for memory and concentration. You must add full and deep breaths with this exercise to help your concentration and posture.
3. Fresh Air
If you study in the park or outside your home, it will make give you benefits of exercise and fresh air. You can take a coffee for a natural refresh.
4. Exchange It Out
You can extend it for a yoga ball. It will help you more to develop your posture. This will activate your core stabilizers when you take a seat on a yoga ball. At the time of studying, it will also develop your posture.
5. Regular Breaks
At the time of working with the desk, you have to take regular breaks. It helps to keep the circulation flowing, more able to maintain developed alignment.
6. Hydration
You must have the way to drink water. Keep some water intake up. It can keep your body hydrated. Moreover, it makes you sure that you are taking usual study breaks to use the bathroom.
7. Raise The Hips
You must be sure that your hip is above the knees. Whatever position you are, isn’t matter at all. It will help you to take natural curve for the lower back. This it improves your posture. You can use a rigid cushion beneath the buttocks to raise the hips up to ten centimeters than the knees.
8. Lumber Support
If you like to take a seat, you need to set up the cushion beneath the hips. It gives some lumbar support when you place another rigid cushion under the lower back.
9.Shoulders And Neck
You have to include your shoulders, head area and self-massage of the neck in each study session. It helps to keep the circulation in a smooth state. Moreover, it makes you aware that you’re using your shoulders and neck simultaneously.
Watch: How To Sit Properly In A Chair At Work

Recommended For You
How to Fix Loose Chair Legs? – A Very Useful Guide
Mike J Farman
I’ve been a programmer for most of my life. I live in Chicago, IL with my lovely wife and 2 year old boy. Today, I’m proud to be considered somewhat of an authority on chairs – a seating aficionado if you will. Now, did I choose this path? Definitely not; but my readers demand it!


